
Word Mail Merge
|
|
|
|
|
|
|
|
|
|
|
|
|
|
Word Mail Merge
Additional Resources
Word Mail Merge
Word Mail Merge
|
 |
Thanks to the miracle of computing, you can produce form letters in the privacy of your home or office, just like the big companies do.
|
|
What's on this page... What is a Mail Merge? Create a Mail Merge |
Before you start with the Word Mail Merge, know the following:
To generate letters for mass mailing using the Word Mail Merge helper, you basically have 3 things: Data, Letter and the Final Merge of the two.
Creating a Mail Merge might seem like a daunting task, but just try the steps once or twice and you'll see that it actually will make your work must easier than you think, so let's start...
Create a Word Mail Merge
Before you generate the form letter, write a first draft. That way, you will know precisely what information varies from recipient to recipient, the names and addresses, for example before you start generating the letter.Your Word table, or data file, must contain all the variable information that you will add to the main document when you merge the documents to generate a letter specifically for each person.
To do a Word mail merge, follow these steps:
| 1. | In a new document, create a table with the information of your
recipients. Using the first row of the table for headings called fieldnames, and the rest of the rows for each persons information, called records. Don't add any formatting to the table or text, this is a simple table with data in it and this file will be called a DATA file. For example: As an exercise, use the information below to practice using the Mail Merge Wizard. |
||
 |
|||
|
|||
| 2. | Open a new document and choose Tools from the menu bar, and select Letters and Mailings. | ||
| 3. | Select Word Mail Merge Wizard to open the Mail Merge task pane on the right-hand side of the document window. | ||
| 4. | From Select Document Type, choose Letters. | ||
| 5. | Click Next: Starting document at the bottom of the Mail Merge task pane. | ||
| 6. | From Select Starting Document, choose Use The Current Document. | ||
| 7. | Click Next: Select Recipients at the bottom of the Word Mail Merge task pane. | ||
| 8. | From Select Recipients, choose Use An Existing List. | ||
| 9. | From Use An Existing List click on Browse. Now you need to select the word file in which you have saved the table with the list of recipients. | ||
|
|||
| 10. | Click Next: Write Your Letter at the bottom of the Word Mail Merge task pane. | ||
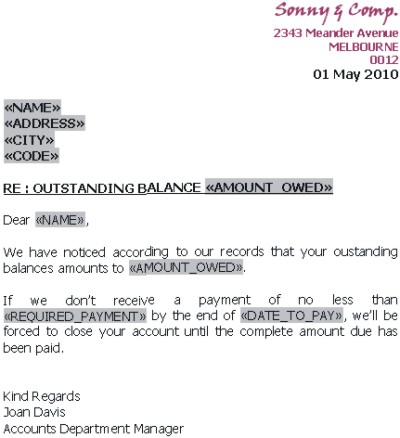
| 11. | Now it's time to type the letter which you want to send every
person. From Arranging Labels, you have to insert the fieldnames from your recipient list and do some formatting to the letter on your page. You can also change fonts and any of its attributes, add text or images, etc. This example shows how to add, change and adjust fieldnames in a letter. |
||
 |
|||
| Click More
Items. You'll see Word shows the fieldnames of your DATA file you have chosen. |
|||
|
|||
|
|||
| You'll see
the fieldnames inserted into the document letter at the cursor's
position. Keep inserting fieldnames and typing the letter, until
you have all that you require. If you've accidentally inserted a fieldname you don't need ― with the cursor at the end of the fieldname, press BACKSPACE TWICE to remove the unwanted fieldname. |
|||
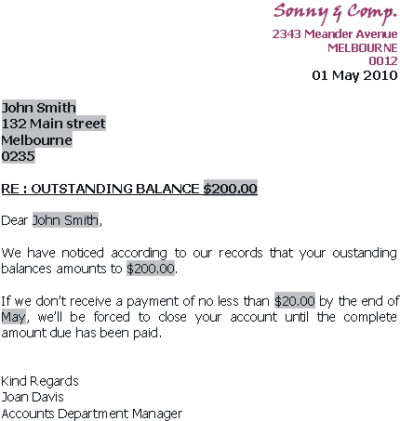
| 12. | Click Next: Preview Your Letters at the bottom of the Mail Merge task pane. | ||
| 13. | Word Merges the DATA LETTERS.doc file containing the people's information with the letter file containing the fieldnames to allow you to see what the final letters will look like. | ||
|
|||
 |
|||
| Once you're happy with the outcome of your letters, go to the next step. | |||
| 14. | Click Next: Complete The Merge, at the bottom of the Mail Merge task pane. | ||
| 15. | From Merge, click
Print. Choose which records to print and click OK. This will take you to the Print dialog box, from where you can print the letters directly. OR... Choose Edit Individual Letters. Word opens a new document with the completed Merged information into separate pages for every person. You can now decided to have certain letters different from others, do the changes in this document. |
||
| 16. | You can choose to Save and Print this file. This would be your final outcome of merged letters. | ||
|
|||
| See also... What is a Mail Merge |
| Back to Top |
| Return to Microsoft Word XP from Word Mail Merge |
Microsoft Word XP
Q & A
Antonyms
AutoCorrect
AutoShapes & Text Boxes
Bookmarks
Borders
Bullets
Change Case
ClipArt
Columns
Convert PDF to Word
Convert Word to HTML
Convert Word to PDF
Customize Menus
Customize Shortcut keys
Customize Toolbars
Delete a File
Delete Text
Download Borders
Download Fonts
Drop Cap
Envelopes
Find & Replace
Fonts
Footers
Format Painter
Headers
Highlight Text
Indent
Labels
Line Spacing
Macros
Mail Merge
Margins
Move or Copy
Numbering
Open a File
Outline Numbering
Page Numbers
Page Orientation
Page/Section Break
Password
PDF to Word Converter
Print Preview
Rename a File
Save a File
Screen Layout
Selecting Text
Special Characters
Spelling & Grammar
Styles
Symbols
Synonyms
Tables
Tabs
Text Wrap
Thesaurus
Undo
Word Counter
Word to HTML Converter
Word to PDF Converter
WordArt
Zoom