
Microsoft Word Help
|
|
|
|
|
|
|
|
|
|
|
|
|
|
Microsoft Word Help
Additional Resources
Microsoft Word Help
Microsoft Word Help - Bullets & Numbering
|
 |
|
|
What's on this page... Simple Numbered & Bulleted Lists End Automatic Bullets or Numbering Insert Bullets with the Dialog box Insert Numbers with the Dialog Box Continue a Numbered List Restart a Numbered List Creating an Outline Numbered List |
Numbered lists are invaluable in books and manuals that present a lot of step-by-step procedures.
Use bulleted lists when you want to present alternatives to the reader. A bullet is a black filled-in circle or other character.
Microsoft Word help you with creating an outline numbered list easily.
Creating An Outline Numbered List
An outline numbered list is when you want to use different levels of numbering. For example:|
1. Vegetables 1.1 Tomatoes 1.2 Pumpkin 1.3 Carrots 2. Fruit 2.1 Apples 2.2 Oranges 2.3 Grapes |
or |
A. Cars A.1) Mercedes A.2) BMW A.3) Subaru B. Motorbikes B.1) Honda B.2) Suzuki B.3) Yamaha |
To start an outline numbered list, follow these steps:
| 1. | Place the cursor where the Outline Numbering should start. |
| 2. | Choose Format ► Bullets and Numbering or right-clicking and choose Bullets and Numbering from the shortcut menu. |
| 3. | From the Bullets and Numbering dialog box, click the Outline Numbered tab. |
 |
|
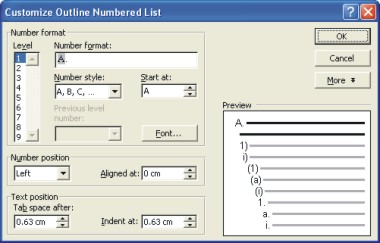
| 4. | You'll notice there are several preset lists to choose from in the Outline Numbered tab. If the given lists don't really have what you need, select a list, nearest to the one you want and click Customize. |
 |
|
| 5. | From the Level list, click each level and do your changes for that level in the Number Format or Number Style list boxes. |
| 6. | Once done with your customization, click OK. |
Once returned to the document, you'll see that Word automatically inserts the first number for the first level.
To enter text on a next level (move to next level), do the following:
| ► | Enter to have the
cursor at a new number. Press TAB to move the current number to the Next level. |
| ► | Enter to have the
cursor at a new number. Press SHIFT + TAB to move the current number to the Previous level. |
| ► | Press ENTER TWICE to Stop the Outline Numbering list. |
Microsoft Word XP
Q & A
Antonyms
AutoCorrect
AutoShapes & Text Boxes
Bookmarks
Borders
Bullets
Change Case
ClipArt
Columns
Convert PDF to Word
Convert Word to HTML
Convert Word to PDF
Customize Menus
Customize Shortcut keys
Customize Toolbars
Delete a File
Delete Text
Download Borders
Download Fonts
Drop Cap
Envelopes
Find & Replace
Fonts
Footers
Format Painter
Headers
Highlight Text
Indent
Labels
Line Spacing
Macros
Mail Merge
Margins
Move or Copy
Numbering
Open a File
Outline Numbering
Page Numbers
Page Orientation
Page/Section Break
Password
PDF to Word Converter
Print Preview
Rename a File
Save a File
Screen Layout
Selecting Text
Special Characters
Spelling & Grammar
Styles
Symbols
Synonyms
Tables
Tabs
Text Wrap
Thesaurus
Undo
Word Counter
Word to HTML Converter
Word to PDF Converter
WordArt
Zoom