
Microsoft Word 2007
|
|
|
|
|
|
|
|
|
|
|
|
|
|
Additional Resources
Microsoft Word 2007 - Page Setup |
 |
|
|
What's on this page... Changing Margins & Orientation Changing Paper Size Changing Vertical Alignment |
Changing Margins & Orientation
Margins are the empty spaces along the left, right, top, and bottom sides of a page, those spaces between the text and the edge of the page. Headers and footers are printed in the top and bottom margins, respectively.
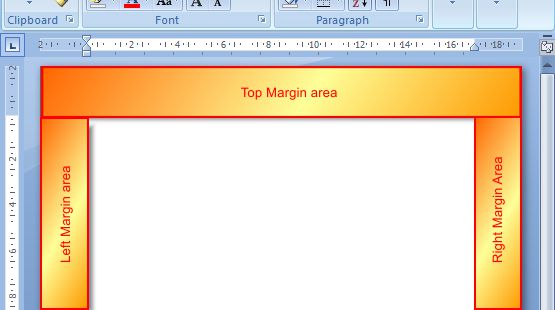 |
Margin areas are clearly marked on a document page as in the picture to the left. |
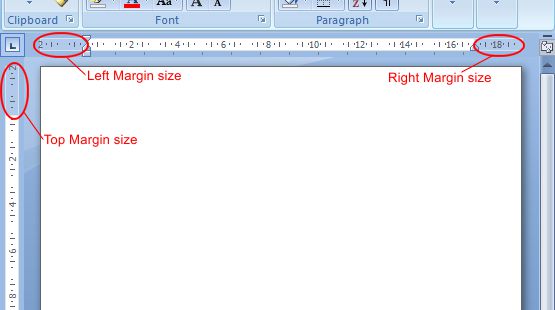 |
You can see on the ruler where the margins are marked. |
|
|
Don't confuse margins with indents! Text is indented from the margin, not from the edge of the page. If you want to change how far a paragraph is indented, use the ruler or the Home Ribbon tab ► Paragraph expand button command and change its indentation. |
You can easily change the margin settings of a Microsoft Word 2007 document.
To change the margin settings of a document, follow these steps:
| 1. | Place the cursor where you want to change margins if you are
changing margins in the middle of a Microsoft Word 2007 document. Otherwise, to change the margins in the entire document, it doesn't matter where you place the cursor. |
||
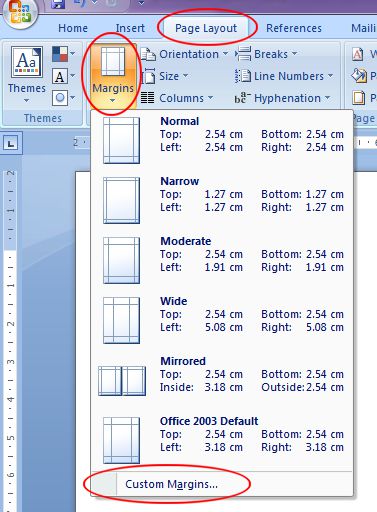
| 2. | From the Page Layout Ribbon tab, click the Margins button. | ||
 |
|||
| Choose one of the set options of choose Custom Margins to enter your own margin sizes. | |||
| Or, you can also double click on the darker area of the ruler | |||
| This will open up the Page Setup dialog box at the Margins tab | |||
 |
|||
| 3. | Choose the settings on the Margins tab and watch the Preview box to see what your choices do: | ||
| ►
TOP, BOTTOM, LEFT and RIGHT or INSIDE and OUTSIDE Set the top, bottom, left and right or inside and outside margins. You will see the Inside and Outside setting if you select Mirror Margins, 2 Pages per sheet or Book fold from the Multiple Pages list box. |
|||
|
|||
| ►
GUTTER Allows extra space on the inside margin for documents that will be bound. Click the up arrow to see what binding looks like as it eats into the left side of the page and alters the left margin. |
|||
| ►
GUTTER POSITION Click the Top option button if you intend to bind documents from the top, not the left side of pages. |
|||
| ►
APPLY TO Choose "Whole Document" to apply your settings to the entire document. "This Section" to apply them to a section. "This Point Forward" to change the margins for the rest of a document. When you choose "This Point Forward", Word creates a new section. |
|||
| ►
MULTIPLE PAGES
► Mirror
Margins Choose this option if you want to print on both sides of the paper and you intend to bind your document. That way, you can set the inside margin, the margin sides of pages where the binding is, and the outside margin, the margin on the sides of the pages that is not affected by binding. |
|||
| ►
MULTIPLE PAGES
► 2
Pages Per Sheet For printing pamphlets and other types of documents in which the pages are half the usual size and are cut in half after printing. When you click this check box, the Top margin becomes the Outside margin, the area in the middle of the page that may need to be larger so that the page can be cut, and the Bottom margin becomes the Inside margin, the area away from the dividing line that doesn't have to be as large. |
|||
| 4. | From the Orientation option, choose Portrait or Landscape. This will turn your page from upright to on its side. | ||
|
|||
|
|||
| 5. | Click OK. | ||

 Portrait Page Orientation
 Landscape
Page Orientation
Landscape
Page Orientation|
TIP |

|
To quickly change the page orientation, choose Page Layout Ribbon tab ► Orientation. |
|
|
Setup your own margins! If you don't care for Words default margin settings, make your own in the Page Setup dialog box and click the Default... button and choose Yes. Henceforth, your new documents that you open will now have your margin settings. |
Another way where you can change the margins in Microsoft Word 2007 is with the Ruler. The Top and Bottom margins with the Horizontal ruler, and the Left and Right margins with the Vertical Ruler in Print Layout view.
Simply drag the margin bar (the space where the white and darker color on the ruler meets) up, down, left or right.
Left Margin: |
Place your mouse pointer between the indent markers on the top-left side of the horizontal ruler. The mouse pointer changes to a double-headed arrow. Click-and-drag to resize the left margin. |
Right Margin: |
Place your mouse pointer above the indent marker on the top-right side of the horizontal ruler, the mouse pointer changes to a double-headed arrow. Click-and-drag, left or right, to resize the right margin. |
Top Margin: |
Place your mouse pointer at the top-left of the vertical ruler, where the white and dark or the ruler meet. The mouse pointer changes to a double-headed arrow. Click-and-drag up or down to resize the top margin. |
Bottom Margin: |
Place your mouse pointer at the bottom-left of the vertical ruler, where the white and dark of the ruler meet. The mouse pointer changes to a double-headed arrow. Click-and-drag up or down to resize the top margin. |
| See also... Change Paper Size | Change Vertical Alignment |
| Back to Top |
| Return to Microsoft Word 2007 from Microsoft Word 2007 - Page Setup |
Microsoft Word 2007
TOPICS
- On-screen elements
- Save a file
- Open a file
- Rename a file
- Delete a file
- Select
- Undo/Redo
- Deleting
- Copy
- Move
- Format Painter
- Font Attributes
- Font Dialog Box
- Alignment
- Highlight text
- Character Spacing
- Indent
- Line Spacing
- Change Case
- Symbols
- Borders & Shading
- Download Borders
- Page Break
- Section Break
- Header
- Footer
- Page Number
- Margins
- Landscape/Portrait
- Vertical Alignment
- Paper Size
- Print
- Print Preview
- Thesaurus
- Spelling & Grammar
- AutoCorrect