
Microsoft Word 2007
|
|
|
|
|
|
|
|
|
|
|
|
|
|
Additional Resources
Microsoft Word 2007 - Page Setup
|
 |
|
|
What's on this page... Changing Margins & Orientation Changing Paper Size Changing Vertical Alignment |
Changing Vertical Alignment
The alignment buttons on the Home Ribbon tab allows you to change the horizontal alignment of text. But Word also offers the choice of changing the vertical alignment, where you can have your text start, not at the top of the page, but in the center of the page or even at the bottom.For example, you might have a front page for a booklet and you need to have the name of the book right in the middle, middle of the page.
 |
To change the vertical alignment, follow these steps:
| 1. | Place the cursor where you want to change the vertical
alignment, if you are
changing the vertical alignment in the middle of a document. Otherwise, to change the vertical alignment of the entire document, it doesn't matter where you place the cursor. |
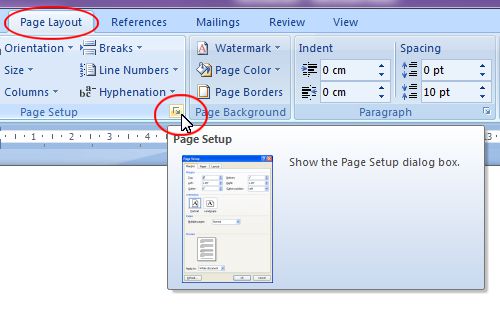
| 2. | Click the Page Layout Ribbon tab, then, from the Page Setup group, click on the Page Setup expand button to get to the Page Setup dialog box. |
 |
|
| 3. | Click the Layout tab. |
 |
|
| 4. | From the Section Start drop-down list, choose one of the
following: "Whole Document" to apply your settings to the entire document. "This Section" to apply them to a section. "This Point Forward" to change the vertical alignment for the rest of a document. When you choose "This Point Forward", Word creates a new section. |
| 5. | From the Vertical Alignment drop-down list, choose Top, Center, Bottom or Justified. |
| 6. | If needed, click the Line Numbers button,
check-mark the Add Line Numbering checkbox and
click OK. Line Numbers are added to the right of the text, inside the margin area. This is an automatic numbering of each line used on a document page. |
| 7. | Click OK. |
| See also... Change Margin & Orientation | Change Paper Size |
| Back to Top |
| Return to Microsoft Word 2007 from Microsoft Word 2007 - Page Setup |
Microsoft Word 2007
TOPICS
- On-screen elements
- Save a file
- Open a file
- Rename a file
- Delete a file
- Select
- Undo/Redo
- Deleting
- Copy
- Move
- Format Painter
- Font Attributes
- Font Dialog Box
- Alignment
- Highlight text
- Character Spacing
- Indent
- Line Spacing
- Change Case
- Symbols
- Borders & Shading
- Download Borders
- Page Break
- Section Break
- Header
- Footer
- Page Number
- Margins
- Landscape/Portrait
- Vertical Alignment
- Paper Size
- Print
- Print Preview
- Thesaurus
- Spelling & Grammar
- AutoCorrect