Word Tables
|
|
|
|
|
|
|
|
|
|
|
|
|
|
Additional Resources
Word Tables | Page 2 |
 |
The time will come when you need to put text into little boxes that are organized into columns and rows. Yes, were talking about tables here. As everyone who has ever worked on one knows, tables are a bit-of-the-unknown if you don't know how they work.
Getting all the columns to fit, making columns and rows the right width and height, and editing text in a table is not easy. So problematic are tables that Word has devoted an entire menu to constructing them: the Tables menu.
Fortunately for you, the commands on this menu makes formatting and working with tables easy.
This page explains how to create Word tables, enter text into tables, change the number and size of columns and rows, sort and format tables.
Creating a Word Table
Word offers no less than four ways to create the cells and rows for a Word table:| 1. |
|
| 2. |
|
| 3. | Table ► Insert ► Table command. |
| 4. | Table ► Convert ► Text to Table command. |
Insert Table Button
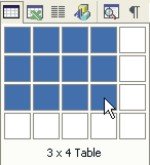
The fastest way to create a table is to use the Insert Table button.To create a table using the Insert Table button, follow these steps:
| 1. | Place the cursor where you want the table to go. | ||
| 2. | Click the Insert Table button, drag out the menu to the number of rows and columns you want, and let go of the mouse button | ||
|
|||
Draw Table Button
That's easy enough. Another easy way is to pretend that your computer is a scratch pad and draw a table. This is the way to create Word tables if you want rows and columns of different widths and heights.To draw Word tables using the Draw Table button, follow these steps:
| 1. | Click the Tables And Borders button on the Standard toolbar to display the Word Tables And Borders toolbar. | ||
|
|
|||
| 2. | To draw a table, choose Table ► Draw Table or click the Draw Table button on the Tables And Borders toolbar. | ||
|
|
|||
| Choose a thick line from the Line Weight drop-down button on the Tables and Borders toolbar to see the lines better as you draw them. | |||
|
|
|||
|
|||
| 3. | Start drawing. As you drag the pencil on-screen, you get columns and rows. | ||
| 4. |
If
you make a mistake, click the Eraser button
on the Tables And Borders toolbar. The pointer changes into an eraser. Drag it over the parts of the table you don't want. |
||
|
|
|||
| 5. | After you've finished drawing the table, click the Draw Table button again to revert the mouse back to a mouse pointer. | ||
Insert Table Dialog Box
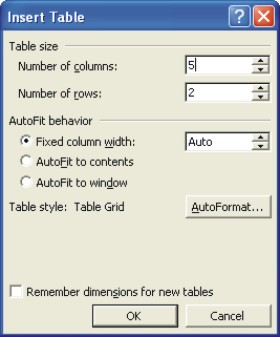
To create a table using the Insert Table dialog box, follow these steps:
| 1. | Place the cursor where you want the table to be. | ||
| 2. | Choose Table ► Insert ► Table. The Insert Table dialog box appears. | ||
|
|||
| 3. | In the Number Of Columns box, enter the number of columns you want. | ||
| 4. | In the Number Of Rows box, enter the number of rows you want. | ||
| 5. | Under AutoFit Behavior, you can enter a measurement in the Fixed Column Width text box to make all columns the same width. (The Auto setting creates columns of equal width and stretches the table so that it fits across the page between the left and right margins). | ||
| 6. | Click the AutoFormat button to open the AutoFormat dialog box from which you can choose one of Words table formats. | ||
| 7. | Click OK. | ||
Convert Text To Table
The fourth way to create Word tables is to convert text that you've already entered. This is the way to go if you've created a list and you don't want to go to the trouble of re-entering the text all over again for the new table.To convert text to table, follow these steps:
| 1. | Either press Tab or enter a comma in the
list where you want columns to be divided. For example, if you are turning an address list into a table, put each name and address on one line and press Tab or enter a comma after the first name, the last name, the street address, the city, the state, and the postal code, etc. For this feature to work, each name and address line must have the same number of tab spaces or commas in it. |
||
| 2. | Start a new paragraph press Enter, that is where you want each row to end. | ||
| 3. | Select the text you want to convert into a table format. | ||
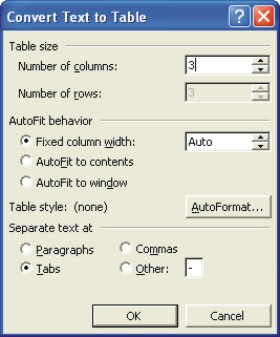
| 4. | Choose Table ► Convert ► Text to Table. | ||
|
|||
| 5. | Under Separate Text At option group, choose Tabs or Commas to tell Word how the columns are separated. | ||
| 6. | Choose an AutoFit Behavior option, if you want. | ||
| 7. | Click OK. | ||
Microsoft Word XP
Q & A
Antonyms
AutoCorrect
AutoShapes & Text Boxes
Bookmarks
Borders
Bullets
Change Case
ClipArt
Columns
Convert PDF to Word
Convert Word to HTML
Convert Word to PDF
Customize Menus
Customize Shortcut keys
Customize Toolbars
Delete a File
Delete Text
Download Borders
Download Fonts
Drop Cap
Envelopes
Find & Replace
Fonts
Footers
Format Painter
Headers
Highlight Text
Indent
Labels
Line Spacing
Macros
Mail Merge
Margins
Move or Copy
Numbering
Open a File
Outline Numbering
Page Numbers
Page Orientation
Page/Section Break
Password
PDF to Word Converter
Print Preview
Rename a File
Save a File
Screen Layout
Selecting Text
Special Characters
Spelling & Grammar
Styles
Symbols
Synonyms
Tables
Tabs
Text Wrap
Thesaurus
Undo
Word Counter
Word to HTML Converter
Word to PDF Converter
WordArt
Zoom


